Investing in Initial Public Offerings (IPOs) has become an appealing option for many individuals looking to expand their portfolios. With the convenience of the SBI Pay UPI App, you can now approve IPO mandate requests right from your smartphone, making the process of securing an IPO investment more efficient and accessible. However, understanding the steps required to approve your IPO mandate on the SBI Pay UPI App is essential to avoid any last-minute issues.
This guide will walk you through each stage of the IPO mandate approval process, from initiating the IPO application in your Demat account to successfully approving the mandate request on the SBI Pay UPI App. By following these steps, you can ensure that your IPO funds are reserved securely and smoothly, enhancing your overall investment experience.
How to Approve IPO Mandate Request on SBI Pay UPI App
With the rise in popularity of Initial Public Offerings (IPOs), many investors are eager to participate in new market opportunities. Approving an IPO mandate request on the SBI Pay UPI App is a crucial step in securing your application and ensuring the necessary funds are reserved. The SBI Pay UPI App makes this process straightforward, and by following these steps, you’ll be able to approve your IPO mandate with ease.
Getting Started with IPO Mandate Approvals
Before we dive into the approval steps, it’s essential to have a few things in place to make the process smooth and hassle-free:
- Download and Register on the SBI Pay UPI App: If you’re new to the SBI Pay UPI App, download it from your app store and follow the prompts to create an account.
- Link Your Bank Account: Double-check that your bank account is correctly linked to the SBI Pay UPI App, as this will ensure smooth fund transfers.
- Ensure You Have a Valid UPI ID: A valid UPI ID is needed to apply for IPOs and approve the mandate requests that follow.
Step-by-Step Guide to Approve IPO Mandate on SBI Pay UPI App
Let’s walk through the steps you’ll need to follow to approve an IPO mandate request on the SBI Pay UPI App. Keep in mind, you’ll need to apply for the IPO first on your Demat account platform, using your SBI Pay UPI ID.
Step 1: Submit Your IPO Application through Your Demat Platform
Begin by logging in to your Demat account on platforms like Zerodha, Groww, or Angel One, and applying for the IPO using your SBI Pay UPI ID. Be sure to submit your application during market hours (typically 10 AM to 12 PM). After you submit the mandate request, you’ll receive the IPO mandate on the SBI Pay UPI App within a few hours.
Step 2: Open the SBI Pay UPI App
After a short wait, open the SBI Pay UPI App on your mobile device. Make sure notifications are enabled so that you’ll receive timely updates about the mandate.
Step 3: Log in Using Your MPIN
Next, enter your MPIN to securely log into the app. This step is necessary to access the UPI mandate approval section.
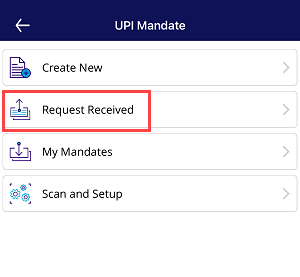
Step 4: Find the UPI Mandate Section
Once logged in, navigate to the home screen, where you should see an option labeled UPI Mandate. Tap on this option to proceed.

Step 5: Go to Requests Received
Within the UPI Mandate section, look for a tab or option that says Request Received. This area displays any pending requests, including your IPO mandate request.
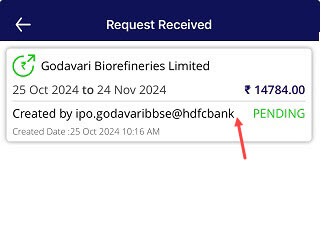
Step 6: Open Your IPO Mandate Request
Scroll through the list of requests, if necessary, to find your IPO mandate request. Once you locate it, tap on the request to view more details.
Step 7: Approve the Mandate Request
At this point, review the information carefully, including the amount to be blocked. If everything looks good, click the Approve button to authorize the mandate.
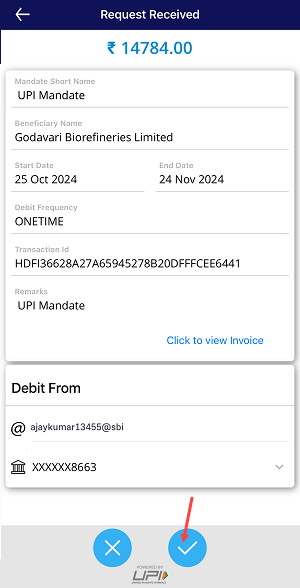
Step 8: Enter Your UPI PIN to Confirm
Finally, to complete the mandate approval, enter your UPI PIN. This step finalizes the approval, confirming that the requested amount will be temporarily blocked in your bank account.
What to Expect After Approval
Once you complete these steps, your IPO mandate request is officially approved. Here’s what will happen next:
- Amount Blocking: The specified IPO amount will be blocked in your bank account. This amount will only be deducted if you receive an IPO allotment.
- Automatic Debit or Unblocking: If you’re allotted shares, the amount will be debited automatically. If you don’t receive an allotment, the funds will be unblocked within 24 hours, so they become available in your account again.
Conclusion
Approving an IPO mandate on the SBI Pay UPI App is a straightforward process once you’re familiar with the steps. This guide ensures you’re ready to manage your IPO mandates effortlessly, keeping your investments organized and secure. Don’t forget to stay updated on your allotment status and watch for any notifications from your UPI app.