I have been using the Axis Pay UPI application, which is offered by Axis Bank, for all my UPI transactions related to my Axis Bank account. Recently, I applied for an IPO and created a UPI mandate using my Axis Pay UPI ID. I then approved it on the Axis Pay app.
I thought it would be useful to share step by step tutorial on how to check IPO UPI mandate requests and approve them on the Axis Pay application.
Axis Pay UPI application offers the convenience of linking any bank account without the need for an Axis bank account. This means that users can link their account from any bank to the app and enjoy seamless UPI transactions.
So let’s come to the point and learn how to approve the IPO UPI mandate on the Axis Pay app.
1. Create an IPO Mandate With Axis Pay UPI ID and Apply for an IPO
First of all, we will apply for an IPO from the Demat account and create a UPI mandate using Axis Pay UPI ID which is linked to our bank account. Please apply for IPO during market hours to receive mandate requests instantly. You will not receive mandate requests outside market hours.
(1) Open your Demat account mobile app whatever you are using and open the IPO dashboard where you can see all available IPOs, select your IPO and proceed to apply.
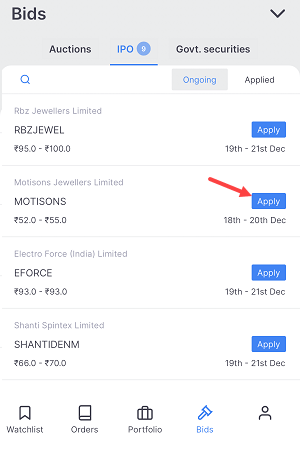
(2) On the next screen, click on the Apply button to apply the selected IPO.

(3) On the next screen, type your Axis Pay UPI ID and enter the lot number you want to apply. Now submit your IPO application.

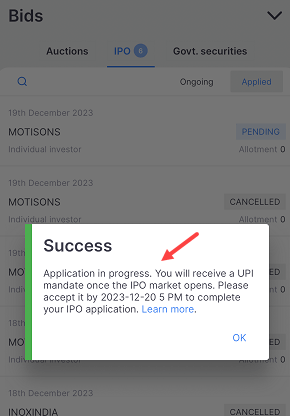
(4) Now we have successfully applied for IPO and UPI mandate created. Now wait for 4-5 minutes to get the mandate request on the Axis Pay application.
Now we will approve the IPO UPI mandate on the Axis Pay App:-
2. Check and approve the IPO Mandate on the Axis Pay App
As I said, you need to wait at least 4-5 minutes to receive a Mandate request on the Axis Pay app. Now follow these steps to approve the mandate request:-
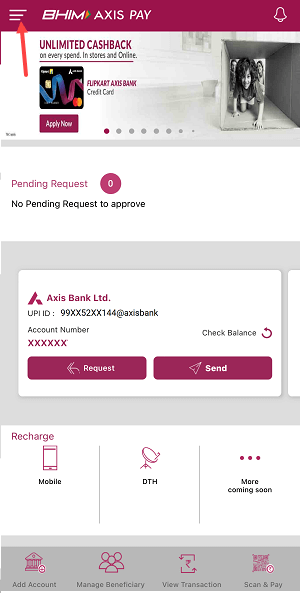
(1) Open Axis Pay and login to your account. After login, tap on the menu bar to view options.
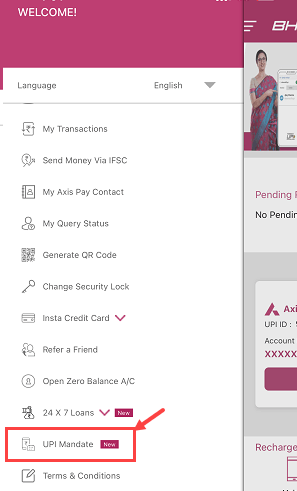
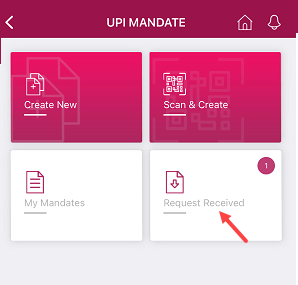
(2) Open “UPI Mandate” from the menu list.
(3) You can see mandate notification in the “Request Received” section, tap and open.
(4) You can check your IPO mandate request now. Click on Accept to approve the mandate request.
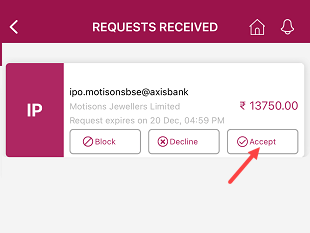
Congrats, your IPO UPI mandate request has been approved successfully. This means that the IPO amount will now be blocked in your bank account. Please note, that the amount will not be debited at this moment. It will only be debited from your bank account when you are allotted shares. Read also: How to link Aadhaar card with Axis Bank account online
In case you do not receive an IPO allotment, the blocked amount will be unblocked within 7-10 working days.
This way you can create and approve the IPO mandate on the Axis Pay UPI application. If you are facing any issue on other UPI apps then you can try Axis Pay and accept your IPO mandate by following the above steps.